Tag Archives: creative

Triangle Pouches

Saturday’s project was to make a different type of bag for traveling, overnight or even make-up. This particular bag is related to the previous post Sewing Day – Make up pouches. One of the differences is you don’t sew a box style bottom and you only sew the ends across, but opposite from the other.

20160214_124634-1_resized

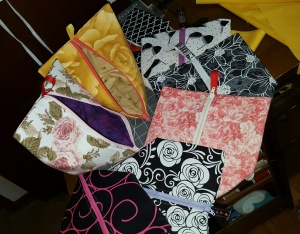
I actually received one of these from a older lady years ago when I was a moderator of a yahoo group. Do they have those anymore, laughing. I would do different type of swaps with women throughout the United States. She got involved with all my swaps and she thought she would send me something special. I still use it today. I LOVE IT! And I wanted to copy it not knowing it had a name as well as the easy process – triangle pouch.

This is an excellent item to make with all those remnants you have laying around the house. Even if you don’t have any remnants at home, you can always check the fabric stores to see what they have in order to make them. All you need is 10 inches, even 16 inches and you can make 4 of them. This could be a good project for a young girl to learn how to make. I was uneasy about zippers, but not anymore. A good way for a younger child to learn. When I have customers coming in for daughters and granddaughters learning to sew, this will definitely be on my list of items to learn. I can just see these 9-13 year olds making these for all their friends.

The other neat thing about these, their great for presents. You could whip up a bunch of them and use them for Christmas, sorry I’m late. Presents for teachers, church members, relatives, friends, the list goes on. Another thing, it doesn’t have to be for the teen or adult woman, it could be great for younger girls to put hair products or even their own private nail polish and other items. Another thing, why is this geared only for the females, this could be a cute item for smaller boys. Using a boys fabric, they could put their small cars in it and zip it up and be on the way to their friends, grand parents or even to carry with them when being in the car for a lengthly drive. Its very compact.Very versatile.

How did I stumbled on this bag or pouch? When I was googling youtube for pouches with zippers. The video I was watching was very informational. The thing is, the video I was viewing was for smaller pouches, for things you use in your craft room for example. You used a piece of fabric that was 5 x 10 whereas mine were 16 x 10. So no matter what size you make all you need is fabric, batting or interfacing and you need a zipper that is 10 inches or longer. You can view the video here  https://www.youtube.com/watch?v=cXZ6BTEnPE4 Vanessa great job in explaining how to create this fun and easy item. I plan on looking at more of your videos!

After dinner I had 7 bags to make and I figured I would time how long it would take to complete them. Even though there were breaks or interruptions, I was able to get them all completed within 3 hours. Not bad at all, however, I did cut all the fabric and batting early in the morning so a step avoided. Heck you could take a bunch of fabric and just cut it up and store in a zip lock bag for the future, you know that unexpected gift!

I had a lot of fun making these up and I am planning on selling them. And I feel the price will be just right. I am also going to be using them for different grab bags that I will have throughout the year down at my booth. If your interested in purchasing one of them, as you are not a sewer and you could use a few pouches/bags, just give me a jingle!

Thank you for viewing my post – Triangle pouches. Please come back for more ideas. Check out a closer look of the ones I did. They fold up really nice too when not in use!

This slideshow requires JavaScript.


Cold and rainy – Simply Spring Birds and Buds

Well haven’t seen any snow, but it is cold enough. I was reminded once again, when you turn off the furnace, put it back on when you know its going to be cold the next day. Hey I’ve got too much on my mind to remember these things and what’s wrong with your fingers or eyes to check if its on or not – LOL.

Did some machine embroidery again today, reminds me I have towels in the washer that I am preshrinking… <run downstairs and transfer>

Here is one of the new designs from EmbLibrary that was purchased from their Wishful Thinking promotion from this week-end. I am very happy with the outcome once again of their design. This makes a great set for any occasion, remember Mother’s Day is coming up. Was thinking of putting this on my ETSY site, but not sure whether to put it as a set or individually. Can always put in the description area, if interested as both towels and apron, converse with me. Can indicate a price and they can get the whole package deal.

Started a second design, the apron only got completed. That’s why the towels were in the wash. Don’t like to embroider on items that haven’t been preshrunk. The design is being done in green, matching towels will be green. These towels are really nice. They were purchased from All About Blanks. Susan has great quality items and her prices are very reasonable. Have to take a trip over and see what’s new.

These items were done using fast frames. It almost seems that I might pack away my hoops since the frames are working very nicely (any one interested in an extra set of PR 600 hoops). I just found out that they have a jumbo fast frame now. Get this, 12 x 14 sewing field. Guess what <giggle> I’m buying one!!! Lets see, metrothread last week, EmbLibrary yesterday, uhm fast frame tomorrow. Gonna call my sewing store to see what price they will give me. AllBrands has it on sale for 99 bucks, lets see if my sewing store wishes to continue receiving my business by giving me a better deal <wink>.

Okay so time for me to start downloading items to flickr and etsy. I’ll keep you posted on my projects. And guess what – – – ITS SNOWING!!!!! ARGH!!!!!

Aren’t these a “Hoot”

On Friday decided to get into the sewing room and do some machine embroidery.

Jennie Baer of Homeberries is known for hand embroidery, but as I stated late last week she is learning to do machine embroidery. Decided to check out her “OWL” design for a couple reasons; owls are popular and there are sew many applications in using an owl.

Here I have put her applique artwork on a purse, mother/child apron (with a cute saying, credit from Allie) and on colorful children’s tote bags. 

The purse that was bought, went to open it so the stitching would be hidden by the lining, but dang, the way the purse was constructed, there was no way that it could be done. Can easily put a pocket over the stitching in the same fabric as the applique.

On the children’s tote bags, small tote is about 4 x 6 for crayons and a medium tote that measures 7 x 8.5 x 3(depth). Used the fast frames for these projects. The small tote was too small for the size of the applique so editing needed to be done through Embird. Added snaps to both totes so #1 the crayons wouldn’t roll out and #2 you can snap the smaller tote to the other one when traveling, that is as long as the item in the bigger bag doesn’t extend the top. These totes would be especially great for the upcoming summer for vacation or little tikes can use it going to the library or to grandma’s, 100 uses!

I really like the design Jennie did and it was so simple. Visit her Homeberries site, on side bar,  to check pricing and her other designs that are available.

Pin Cushions or Just Fluttering by

dscf2942Last week I indicated that it would be nice to see some new pin cushion designs. Here is the first one of my designs that I completed last night. These pin cushions are quick to put together and you can elaborate more on the wings with different emblishments. This takes half of a fat quarter to complete. I am planning on doing more butterfly designs in between my other projects.

After stuffing them, I realized that not only can these be pin cushions, but they can be used in a mobile or attached to a thin fishing line, suspended from a ceiling in a sun room or on a porch. You can attach the butterfly to a thin wooden dowel rod and stick it into a potted plant. Remember the birds I did from Spools last year? There are many possibilities to this “Butterfly”.

dscf2940When making my prototypes, I had to be resourceful in completing the body because I lacked the material or supplies. I would use a thick black pipe cleaner for the body instead of rolling a scrap of fleece material that was sewn together. Had some anther in white to make the antennae and glued it to the inside of the fleece. Originally bought the anther for another pin cushion, but it works for these butterflies, just had to use a sharpie black marker.

I have yet to learn how to download the pattern to my computer so that I can learn how to post or link it for me to share with others. Still have to write up the simple instructions, but if you are interested in this pattern, feel free to contact me. I do indicate that you can use this pattern and make as many items as you want, however the design is copyrighted and I would appreciate that you point others to my blog and not post the pattern as yours.

I am sure my sister wouldn’t mind a few of these to go with the birds I did for her last year. She could have them scattered around her room.

Go GREEN – Pajama Clutch Purse

 dscf28911Thought I would be productive today and sew something quick and easy.

Here is a clutch purse that I made, no pattern, just grabbed something and started to creative.

Thing is, this material used belonged to a pair of pajamas that I bought on clearance several years ago. Didn’t wear ’em much, just liked the material, a silky 100% polyester.

Took the bottom shorts, ironed all the creases out. Figured on a size then ironed fusible stabilizer to the cut up shorts. Fabric wasn’t squared so remeasured and cut again. Then sewed up the bottom of the purse. Opened the seam and sewed the seam down 1/4 inch from the center of the seam.

Stitched up the side seams leaving 1/2 inch at the top for the front panel flap and for when adding the lining. Did a boxed bottom measuring only 1/2 inch from the point. Finished with the exterior of the clutch purse. Wanted the front panel to be different than others, so taking a piece of fusible stabilizer, laid it across the clutch. Took ruler and measured out the front panel. Dah, I had the purse inside out so when I measured the stabilizer I had the pattern backwards, rut ro.

Taking the top of the pajamas shirt, ironed out the creases. Placed fusible stabilizer and ironed. Took the top and folded at the end of the flap where the magnetic snap would be placed.  Laid material nicely and proceeded to cut around the stabilizer adding 1/4 inch to allow for seam to be right on the line of stabilizer. Sew up the front panel, turn it right side, iron, top stitch around the flap, complete by adding magnetic snap (oh yes I left the top of the flap open because that will be sewn shut when I put it to the body of the clutch). 

Attach the flap from seam to seam on back of exterior of clutch purse. Sewn 1/4 inch to hold in place. Stitched another line a few tacks away from the 1/4 line. Grabbed some plain ‘ol black cotton fabric for the lining. Cut to size, sew seams, ready to add to the purse. Placed clutch inside lining, right sides together. I am forever doing this backwards and usually consult with my daughter, but she was at work. Sew around top, making sure my flap was laying flat inside. Left about 5 inches in the front allowing to turn purse inside out. Add magnetic snap on the exterior of the purse. Fold and press 5 inch opening nicely, ready to finish it off. Top stitched all around the top of the purse all the way around.

dscf2895End product, a very nice polka dot clutch purse ready for the evening out. Interesting what you can do with fabric from a piece of clothing that you once liked, just like my purse that I made from the pink sweater. Left over fabric from this project, can make another style purse or make a wallet to match! Wallet did I say wallet… Ran back to the sewing room and since pockets were not made for this purse, here is a wallet to stuff money, ID or anything else small.

Deliciously Crafty Bunny from Urban Threads

bunny1_lgAs always I am hopping all over the place looking for new and egg-citing things.

I stumbled upon this free Deliciously Crafty Bunny last night and starting checking out the site (read about Niamh and how she got started) Urban Threads.

I really do like Urban Threads because the designs are very unique, different and reasonable. Please note I didn’t say “cute” but they are in a quirky way! I’ve already put some items in my FAV folder. I love the “Jester” design, especially done in “Tone on Tone”. 

Niamh really knows her stuff and presents it well. I don’t know if there are any other sites out there like hers, but she brings in a different perspective on design with her artwork.

Thing is Urban Threads is not just machine embroidery. The designs come in hand embroidery AND digitilized stock art. So like if your into scrapbooking, you can browse and purchase.

Now back to the free Deliciously Crafty Bunny. Crafty Bunny will be available until Easter, April 12th. In order to claim this cute little fella you have to register as a member. When you register you will receive a newsletter every Friday showing off the new items that will hit the site.

Don’t forget to check out the projects page. You sew have to check out the baby bib project, then look at the design “the cow jumped over the moon” ALMOST! LOVE IT!!

 Sew get hopping over to Urban Threads.

Would have had this up last night but was having internet issues!

Free Purse Patterns

Yesterday I bought a magazine from my neighborhood JoAnn’s Fabric store. I was good and walked out without purchasing any fabric, yet I had a few bolts in hand. If you don’t find it at your local fabric store, Hobby Lobby, check out your neighborhood grocery store.

l_100423852My purchase was the current issue of Better Homes and Gardens Creative Collection magazine. Across the front of the magazine it says in big bold letters “Bags, Pillows and Pincushions”. It has lots of quick and easy projects. They have Amy Butlers favorite clutch in this issue, the pattern is not in the magazine, but if you are a member to Better Homes and Gardens newsletter, you can download the pdf file of the pattern. I really do like this pattern and you will too especially because its Amy Butler.

mosaic8214471As I blogged yesterday, I ran into this cute little purse that was designed by Rae. You can go to Rae’s blog, Made by Rae and download the pdf files for her Buttercup purse. I was surprised when I saw that it only takes a fat quarter to make the exterior of this purse. It appears to be a very simple and easy purse to make. 

If you haven’t noticed, I really like purses and tonight I was looking at fabric purse books at Barnes and Noble. I might be requesting several books and then reviewing them when they have been received at the store. Later I will show you which ones I purchased. When I was a moderator on a yahoo group we did a purse, bag, tote swap. The beautiful purses that where made by the women on that board was unbelievable. Even though I did not participate, but put it all together, one of the participants made me a special bag with my initials machine embroidered on it. I use that bag when ever I go away, whether it be a week-end trip or a vacation. 

Please be advised that both these patterns are copyrighted and can only be sewn for your purse-nal use or for gifts. You cannot make the items and sell for a profit. 

In the future I will be posting more free purse patterns that I run across. If you have found a nice pattern and would like to share, feel free to comment on this post with the url if you know it.

Machine Embroidery Applique – Tutorial 101 – Spray Adhesive

Last Sunday my new sewing buddy, Tiffany and I got together. She is new to machine embroidery and she asked if I could help her out. She was having some problems centering designs on small t-shirts. We were discussing several different items and one of the items was regarding machine embroidered applique. I told Tiffany I would do a tutorial on my blog. Tiffany, here we go and just to let you know, on this tutorial, I used spray adhesive.

dscf2476Instead of looking through all my stuff to find a piece of baby clothing, I took a piece of fabric to work with. Applique can be done in all types of applications, towels, clothing, home decor and sew on. Took a piece of iron on tear away stabilizer and applied it to the back of the fabric. Tiffany, in this example I hooped both the stabilizer and fabric, I did not do what I showed you the other day. You can’t see in this photo the outline stitch of the design that I am using because the thread color is very light.


dscf2477

You will see why on this particular design why I decided to use  furry fleece for the applique. As I’ve stated before I don’t like to use spray adhesives, but this design has curves, thus I would have some difficulty trimming the excess material. I lightly sprayed the fleece and then laid it on the hooped fabric making sure that it was laying flat. I then did the next set of stitching where the two fabrics are sewn together to hold in place.


dscf2478Now we are ready for the next step. Time to trim all the excess fleece. Take a pair of applique scissors and trim as closely as possible to the stitching making sure you don’t accidently snip a stitch or knocking the hoop apart. Can you tell the design yet? Hmm, appears that the design doesn’t look centered. Is it possible that there is going to be some embroidery below the applique? Could be.


dscf2479Next step is putting the hoop back on the machine to do some embroidery. Oh we have some little orange feet. After the feet are done, the hoop is removed from the machine again.


dscf2480In this photo I place a piece of water soluble stabilizer on top of the applique. Even though the furry fleece does not have a thick nap that the stitches will sink into, I don’t want the satin stitches to fall between any of the fleece or the fleece to intermingle (is that a good word to use??) with the satin stitches. This is the first time I am using a furry fleece as an applique, so as experimenting and writing a tutorial, covering all bases for a better outcome or product. Put the hoop back on the machine and time to finish the rest of the design. After all the stitching was completed, I took and removed the water soluble.


dscf2482Here is the finished product. A cute little duckling just in time for Easter. Now you can see why I used the furry fleece for this particular applique design. I figured that once I was done with this tutorial I had to provide where I got the design. This design is from Anita Goodesigns “Ducks”. The design set consists of 27 appliques pertaining just to ducklings. The perfect set for any baby’s room. This month they have a design set of applique horses. There are several applique sets for Baby.

Next time I do a tutorial for machine embroidery applique, I am going to be showing how to use the product “Heat and Bond”. As I stated earlier, this design had too many curves that I would have had trouble.

Machine Embroidery Design Placement on Towels

I’ve received some requests for my towel swap and am excited. I’d really like to hear from you all and ask that you post a comment, but again contact me at my private email address insane14now@sbcglobal.net. I will provide you my home address so that you can send your towel and self addressed stamp envelope. Remember the first person’s package that I receive will get to chose from one of my sets in my previous post.

Depending on the design that you are doing determines the type of stabilizer you will use. If you are doing either red work or toile, you will want to use a water soluble type of stabilizer. If you are doing a filled design, you will be needing a tear away stabilizer. If your towel has a nap, you will want to make sure that you put a water soluble on top of the towel so that the stitching does not fall into the nap. 

To figure where to put your design on the towel. Measure the width of the towel or fold towel in half to get your center point. You will be putting your design on the side opposite from the manufactures label, so make sure you have the right end in front of you. Fold your towel in half, place a pin on the fold, then double check your measurement using a tape measure. The norm for placement for designs is as follows. If your towel has a border, you leave 1/2 inch between the bottom of the embroidery and the top edge of the border. If your towel doesn’t have any type of border you measure 1 1/2 inches from the bottom hem.

Check the height of your design. For this example I am using the freebie design from EmbLibrary as my example Spring Daffodil Bouquet. The height of the smaller design is 3 1/2. You take and divide that in half and get 1 3/4. Go to your 1/2 mark or 1 1/2 and go up 1 3/4. This is your center point on the towel, mark this point. Half of your design will be above this mark and of course the bottom half will be below the mark. When you hoop you will try to get it as close to this mark before embroidering.

Now you are ready to hoop. You can hoop your stabilizer and towel together, baste a larger piece of stabilizer to your towel or spray adhesive to your stabilizer and put it to your towel. When you either baste or spray adhesive to your towel, make sure that your piece of stabilizer is at least an inch larger than the actual design. You will have to find the center point of the stabilizer and mark it. To do this, fold side to side and top to bottom. Get the center point and match it up to the towel. When using the basting technique, baste close to the edge of the stabilizer. As I indicated in previous post, I use a iron on tear away so I use a piece of stabilizer and iron it where it belongs.

Above I mentioned that if you are doing a towel with a nap, you need to put a water soluble on top. You take a piece of your water soluble, an inch larger all the way around. Spray adhesive to the towel and place the water soluble on top. Or you can tape the corners or wet the water soluble lightly and place it down on your towel.

You are now ready to stitch. When you are finished you remove the tear away stabilizer or wash the towel to remove any water soluble. I should of mentioned this is the beginning, make sure you wash your towel prior to embroidery. You want to make sure that if the fabric shrinks it is done prior to stitching. Hate to have a puckered up towel. 

If you have any comments or additional information that I neglected to mention, feel free to comment. It is really hard for me to explain on paper how to do stuff! If I did a good job… I’m happy. Please see additional information on placements on bath towels and washcloths.

Bath towel with border 1/2 inch, without border 2 inches from hem

Washcloth with border 1/2 inch, without border 1 1.2 inches from hem

Embellish your towel. Measure the border of your towel. Cut a piece of fabric, that matches a color in your design, one inch all the way around. Fold and iron 1/2 inch all the way around and then top stitch directly to the towel. Now you have a new border and it looks a lot nicer than the purchased one.

Design your own fabric

3037757855_530d496226Have you ever wanted to design your own fabric and then use it for one of your projects.

If you didn’t already know this, now you can design your own fabric and have it printed on high quality 100% cotton from Moda. The swatches shown here are actually created by individuals like you and me.

These particular pieces are the first for a weekly contest and the winner receives 5 yards of either their fabric or other fabrics that are for sale in the future. This is a 100 dollar prize. The other contestants will receive sample fabric, as a parting gift. Which ever fabric is chosen as the winner for the week, can be purchase the following week. 

Now to introduce Spoonflower. It is a site that helps you get your design onto fabric. What you do is save your design that youv’e created in a TIF, JPG, PNG, GIF. File must be less than 25MB. You set up your resolution, upload your design to Spoonflower. You can center your design on the fabric or have Spoonflower place the design in a basic repeat, half-step repeat, or a half-brick repeat. They have information regarding colors and a few quick tips regarding colors. There is so much too absorb on their site, you must go to it. They even have detailed information for photoshop users on color notes and if your not a photoshop user, well they have tips and free tools for creating digital fabric designs. Go to my sidebar to visit and possibly become a member. There is a FLICKR site too. 

You can explore all the members designs. The amount of people that use Spoonflower for their projects is unbelievable. You can see their items on Etsy. Spoonflower has hit the latest issues of Craft magazine and Stitch (new mag published by Quilting Arts). I found out about creating your own fabric through my sister who is an artist. She sent me Photojojo a DIY-photography newsletter and they had a blurb about Spoonflower. 

Pricing is very reasonable; 4 x 4 square is 5.00, fat quarter is 11.00 and a yard is 18.00.

I’ve been wanting to write about Spoonflower since I signed up to be a member, its just finding the time to read and write about it. I still have sew much to absorb. Hopefully I will have a design on there, but finding the time!!!!