Monthly Archives: December 2009

Happy Birthday Bob!

Yup its Robert’s Birthday today and I hope you had a GREAT DAY!!! I’ll see you this week-end….

Yup 28 years ago I had my lil Bobby. What a joy he was. I remember the day like it was yesterday…..

My sister-in-law, Sandy and I went to the North Riverside Mall just to do some looking around and maybe last minute shopping. Yeah the 16th was the lil tikes due date, however Sandy and I were at the mall on the 15th checking out the sales and the crafts.

There was one vendor selling leather products and I was really interested in purchasing a belt. The man selling the wears had asked when I was due and I said actually tomorrow. He said your kidding and I said no. As the three of us talked I could feel Robert moving around, now I didn’t know that I was going to have a boy, but the name was already decided. The guy asked if it would be alright if he felt the baby as him and his wife had tried and tried but was never successful. Sandy and I didn’t feel that there would be any harm, as in those days people where uhm normal and you didn’t have to worry. So he felt my tummy and said it was neat. I indicated to him that I especially liked when the baby kicked or you could feel the foot. He said you could actually feel the foot and I said yeah, matter of fact right here is the foot. He put his hand on my side and he felt the foot, he said “wow”. Sandy and I talked a little bit more to the guy, I purchase a belt buckle for my hubby and we continued our walking.

When we got home hubby, Sandy and I were hungry. We decided to order a pizza. Well I really didn’t want to eat pizza as I just had a icky feeling in the pit of my stomach. We went ahead and ordered and then ate. I only ate a couple of pieces and it was stated, the is not normal. Sandy stuck around for a while longer and then off she was to go home down the street. My hubby went to bed and I stayed up for a lil bit longer as I just wasn’t ready for bed and again I just had that weird feeling.

About a couple hours later I was having some pains, but I really didn’t know if they were actually labor pains. It was bad enough that I had two kidney infections and false labor pains in the past I just didn’t know what was going on. I was watching the clock to see how far apart the pains were just to see if they were constant. Hubby was still sleeping and I decided to call the hospital. They indicated that I should come in when the pains were so many minutes apart. Well mine were closer than what the hospital had indicated.

So I went and woke up my hubby. He jumped out of bed and I said take it slow we don’t have to far to go. So as we drove we talked and every once in awhile I would get one of those stabbing pains. Hubby would say you okay, I’d say yeah as I would hold my belly. He drove a lil faster as he wanted to get me to the hospital quick. As he drove he was approaching a railroad track. As he took the track really fast all of a sudden a sharp pain! OMG!!! Hubby said what, I said major pain. He said you gonna be okay, I started laughing and said yeah, just be careful on railroad tracks, please.

Well he got me to the hospital and the pains were like every 8 minutes. They checked me out and said I wasn’t ready. Not ready, please. They said it could go into the morning. WHAT!!! MORNING!!! I am not going to deal with this for a possible 8 hours or longer. So hubby looked and me and I looked at him. I said go home, you have to work in the morning, I’ll call you when the time comes. He said okay, gave me a kiss and left.

It was like as soon as he left I was being wheeled into the hospital room. Yeah it was time about 1/2 hour from since I got there. They didn’t even have time to get my doctor there. Bing Bang Boom, that was fast. Then I hear the baby cry. Then they announced you have a baby boy. I was so happy, I wanted a boy so badly and so did hubby. I was very excited and couldn’t go to sleep. I stayed awake til 6 in the morning so I could start calling everyone! As soon as 6 came I was calling daddy then grandma.

This was the easiest delivery I ever had, not that my daughter’s wasn’t bad, I am just so happy that I didn’t have to go through a long labor! What a cutie he was, this headful of blonde hair, long eyelashes, pretty blue eyes, the lil fingers and toes, such a bundle of joy. To this day he is still that bundle of joy, all 6’3″ of him!

Love Ya Robert…..

Hugs and Kisses

Mom, Dad, Shell and of course Maggie!

Special Items for Special Lil Girls

I always like making special lil items for special lil girls. A few years ago I made a towel set for the little girl down the street. I saw her and her grandmother last week. As I talked to the grandmother she told me that Angelica still uses that towel set I made. I told the grandmother it was time for a new set.

Besides making a towel set for Angelica, I would be making a set for our nieces and another special friend. The designs I used are from Retroboulvard, the digitilizer is Ytmar. She has done some real nice work in the past. For the youngest niece I went for a design of a child toweling herself off after a bath. The other 3 girls I would do ballerinas. On the hand towels I either put their names on it or a pair of ballet shoes, which the design was received from a free website years ago.

Before I do towels I always make sure that I pre-wash the items not only for shrinkage, but also to get the extra fluff out of the towel. Once washed I am ready to stitch. I used the all in one hoop, with the exception of the large towel. I don’t like to have the burn mark in the nap of the towel. Once the items were hooped I then placed the wash away stabilizer, WunderStitch on top of the towel. WunderStitch is a water soluble stabilizer that washes out of fabrics when completed. WunderSttitch was great with these towels because the towel was thick and heavy. SewforLess carries this item and is always on sale.It is always important to use a water soluble on top of the towel so that when the design is stitching the thread stays on top of the towel, not sinking into the towel.

Another quick and painless day to stitch, here are the towels… washed a second time and they are still stunning.

Ice Luminaries for the season

Last year in one of the woman’s magazines that I read I saw a project for the holiday season, ice luminaries. There are so many ways that you can create these lovely lanterns. This past week-end I went ahead and started making a few just for fun. Of course when the freezer was opened the remarks were, what are you doing now! Then my spouse saw a program on Sunday on making them.

The supplies are very simple and if you have temperatures way below 30 degrees you can actually freeze these luminaries outside instead of using the freezer. You can use all types of plastic containers to make your luminaries. If I drank pop from 2 liter containers I would have started saving them up so that I could line my sidewalk, however I am not a pop drinker. Instead I used my food containers for these luminaries and luck would have it, our snow has melted so you do get the full effect of the outcome. Geez do I see a trend of my luck lately with weather??

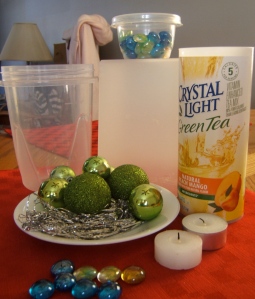
Here are my basic supplies. Two tall containers, both a square and round one. Then some simple items that were frozen into the ice, tinsel, Christmas ornaments and plastic garland (not shown). The pebbles were used to put in smaller containers (and the crystal light could be used as well to give a deeper depth inside the container to place your candle).  When using items to be frozen into the water, you need to do it in layers so that the items don’t float on top of the water.

Not only could you use everyday plastic containers, but you can use like i stated above 2 liter containers, milk jugs, smooth cans, plastic ice cream containers, the list is endless. And you don’t necessarily need to put decorations into your containers, you can just leave them as a block of ice with a candle in the center.

Basically you put a smaller container inside the bigger container after filling it with water. To keep the smaller container from floating around, place some rocks, pebbles, whatever you have available. This will keep the container to set in place during the freezing process. Once the freezing process is done either through the freezer or outside all you need to do is pop the ice from the containers, outside and inside.

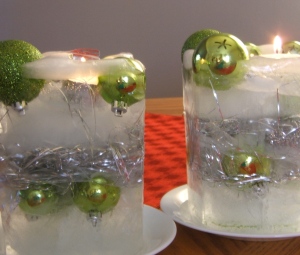
Now like I indicated the rain and warm weather has dampened my opportunity to show what they look like outside in the snow, pout. So instead I merely put them on a plate and took pictures. I can even see this being used as a center piece on the table,]. You can use different size containers grouped together in a round shallow glass pan that has garland wrapped around the luminaries with some decorative Christmas items, like holly or ornaments. You can even use those scented pine cones, thus you are also giving off a nice scent. You will have to make sure that you use some protective item under the glass pan, so that it doesn’t freeze to the table and ruining the furniture, a simple round cork placemat, pot holder or even a folded washcloth.

Not only can you use these as a center piece, to line your sidewalk, driveway, but you can put on your porch, using different sizes, heights placed on a table at the door with your other decorative items. You can even place on on each step up to the house. You don’t have to have clear ice either, put some food coloring into the water to get a nice soft glow effect. What about freezing chunks of ice then breaking the chunks into smaller pieces then placing into another container and then adding cold water to get another effect of your luminary.

Here are the results of my luminaries. If we get some snow, I will be making more to line on our stairs and I will use more than just what I had on hand, milk jugs anyone!

Showing off my daughter

I snuck into my daughter’s portfolio from college the other night. I was really upset cause there wasn’t much there for me to sneek a peek at. She did have one drawing that I really do like in there and I had to show her brother.

In the beginning of the school year they had to do a drawing in the classroom and she did the window. Like she indicated to me and I informed her brother, the leaves in the drawing are actually growing inside the classroom. I’ve been really surprised at her work, she really has an eye and gets the detail.

The one thing she hasn’t or has problems with, hands, feet and faces. Since she needs to work on those areas, in her life drawing class it was mentioned for her to do a drawing with hands. Thus she did. How did she do, well she tried her best.

Andy Warhol is her favorite artist and there is a exhibition in Milwaukee, Wi that runs until January 3, 2010, The Last Decade. I mentioned to her that we could take a trip up there in a couple of weeks when she is not working. We had spent a day at the Chicago Art Institute a couple of months ago and it was amazing listening to her talk about depth, proportion and other areas pertaining to art. She really has an eye to see these things without realizing it yourself.

She had to write an essay which dealt with the Renaissance Era, her most favorite era. She wrote about Botticelli. She had to compared his work of art, Primavera, to another painter’s work. I was surprised how she was really into the Renaissance Era, talking about the angels and how certain artists drew halos incorrectly, artists did not show the proper proportion in facial features, i.e. a mother and child both the heads were the same size or facial features were almost identical. She even pointed out the issues of them not being able to draw hands, fingers were not properly done.

Every week she would have to provide a drawing to her life drawing class. One of her drawings was when we stayed at a hotel when we went to the Art Institute. One of her classmates indicated that it almost looked like it was drawn from a photo, the teacher agreed. When another student showed her work, she made the remark, oh I thought we were suppose to draw from a photo. The teacher said it appeared that it looked like a life drawing, oh yeah I heard that boiling point, giggles. She did a drawing at Panera’s, a eatery, and the depth and dimension was great.

In one of her classes she would partner up with other students and each one would draw certain aspects of the drawing. I had run into one of these drawings in her portfolio. I had asked her about the drawing and she said to me what are you talking about. She had all her drawings on her puter and I pointed it out. She told me her and another girl had done that work. I was amazed at how well both of them did. She called me a stinker and forgot she had it in the house.

There is another drawing that she had to do from a photo and I am wanting to get my hands on it. It is a girl in a Chicago Bear’s jersey. I love the drawing, she did a great job (as soon as I can get my hands on it, it’ll be on here). She likes it too. That particular drawing was in the college’s art show.

In the beginning of the year she would tell me about the naked models that they had to do. She was funny talking about them, lol. I remember when my sister, Susan was taking art classes at the Art Institute and she would mention to our mom about the nude models. My daughter would mostly say, gawd you should of seen the model we had today, talk about gross, laughter, but then came the day with the cute guy, hahaha.

Next semester she is going to take some more pottery courses. I’ll take some pictures of some of her pottery work from high school and college. One of her pieces from high school went all the way to New York for a possible scholarship. She wants to continue her art overseas, its’ll cost a lot less, but she still needs to check into it.

Candles with a cherry Christmas feel

Thought I would do some simple and not so simple projects for the candles around the house to get a festal feeling. The downfall, the one design chosen, to the majority of the simple projects… didn’t want to co-operate! Ho Hum!

The first simple project was to simply stitch out the design on water soluble stabilizer, dissolve the stabilizer and then simply place the design on a candle. Simple, very, but like I said if the design would have stitched appropriately it would have looked even more elegant once the design was placed on the candle. Even though the design is already sticky from the stabilizer I would still put glue on the design to make sure that it adheres. The other nice thing about doing this, you can easily take the item and put on a new candle. The outline of the design screwed up and well we are not all perfect.

The next simple project was to make a candle sleeve for the candles that my hubby loves to burn. Yeah I like to cause some trouble cause he would complain about it some how. Basically you take some tulle and water soluble stabilizer and hoop, then stitch out the design. Once done you simply cut the tulle to the size of your candle glass, height and width, sew a seam and ta da, slip it on the glass. You can even embellish the sleeve by putting decorative trim on the bottom or top or both. Another item that you can use over and over again. If I forgot to mention, you need to wash out the stabilizer.

Now for the more complex project, grrrrr! I don’t even know what to call it, so I will just call it the candle cover.

I saw this idea last year at sewing class and I really did like it. Couldn’t find my instructions so I was on my own. This project is to take 4 5 x 7 picture frames, screw small hinges on each side of the frame on the top and bottom. You will have problems with the last side because you have a square but if you leave the glass out of the last frame until you get the hinges screwed in place it’ll work. Was I successful with the hinges, remember this was a idea for my blog, I used packing tape to put em together, so I cheated. You will see at the end what I am going to use mine for.

Please be advised that each frame will need two pieces of glass. Go to your nearest hardware store and purchase additional clear glass, they will cut it to the size you need. You might even want to see if you can purchase thin plexiglass to use instead. Glass is not very expensive, where the plexiglas will be much more.

Since this was a sample for my blog I only did 3 designs in different fabrics. Well I will not do this on sheer silk again. Very hard to work with. Working with the tulle was great and I got the effect that I wanted. You can even check your fabric store for sheer fabrics with winterland scenes on it. You don’t want to just stitch on the fabric, you want to bunch it up to get a layered look, so make sure you use more than enough fabric when hooping. Take some water soluble place it on the hoop, bunch up the fabric and place it on top of the stablizer, once you feel you are happy with how the fabric looks, hoop it. Prior to stitching you will place another piece of water soluble on top of the fabric. The reason you are putting stabilizer on the top and bottom is to keep the fabric lying properly when you start stitching

Once all stitching is completed you take an ear cleaner and wet to remove the stabilizer around the edges. If you get it all wet, then you will have to wait for it to dry.After cleaning the clear pieces of glass, place the fabric and center the design. Prior to putting the other piece of glass on top, play with the fabric to get a neat effect, overlap the fabric, swirl it around, once you think you have the effect that you want, then put the other piece of glass on top. With the tulle I was able to bunch it up to keep a effect that would look good once the candle would glow through the glass. On the two designs that I used the sheer silk with, I had to take something thinner than a popsicle stick to push the fabric between the two pieces of glass. I don’t care for the effect of the material on the green fabric, however the red, I love it! But then I had to figure how to play with the fabric. You will cut all the excess fabric around the pieces of glass. Place into frame and secure. Now you have your candle cover. You can use all the same fabric and use different designs for each frame.

If you like this idea, you can easily just do one picture frame, placing the candle behind the frame. You would have to get a piece of cork and cut it to the appropriate size and then take small nails and nail the cork into the frame’s bottom.

This project would make a great gift idea. Now what I am going to do with my 3 different frames. They will be used for gifts that can either be hung on the wall or placed in a window. Look look very attractive sitting in the window of my kitchen for the photos below. You can look at the layering effect on each one, again the tulle, I didn’t have to play so much as I did with the green and red. I really do like the swirls in the red.


Windy City, Chicago

Yeah the worse thing about Chicago, Illinois, wind. Yeah I know they call it the windy city, but I wasn’t too happy this morning waking up to, MY CAVE, look at it.

Slowly gets out of bed eyes half closed, raises blinds and looks. Geez what do you want me to do! Yeah the wind took to both sides of the covers I made and wrote about yesterday. Honey how ya gonna fix that, I have all my power electrical boxes and I can’t get them wet. Geez hun you didn’t have a concern last year, oh yeah, I forgot you didn’t have a jeep in there either.

Dragging self out of bed, putting on clothes, goes outside with duck tape and gloves. Snaps the cover all back with the exception of the one with the snaps all busted and the duck cloth cover. Rips a piece of duck tape and attempts to put on fabric and metal. Uhm didn’t work, (*%#$(*&$%#, why did I do this, all it has been is trouble!

Grabs shovel and starts clearing the driveway, figure I would do something more productive cause nobody else would. Oh yeah I never told you 2 years ago I bought a snowblower for my spouse so I wouldn’t have to shovel, day after Christmas it was returned. Now you know why its called the “cave”, he lives in the cave ages! And just think when I went to get that snowblower I was rear ended (no damage let the lady go). The trouble we go through – – – MEN!

So the driveway is cleared and I carefully take down the one side. The fabric is full of snow and frozen solid from the rain and freezing temps! Drag into the house and cut the straps. Takes all the straps upstairs and starts sewing elastic to the straps, makes 4 1/2 inches allowance. Realizes she has cut each strap in different places, geez which strap belongs to what on that dang thing!!!

Has two straps that she will be able to determine the proper length and then takes the straps and puts them back on the cover.

Grabs the cover and takes it back outside and snaps it back into place being careful in the snow with the ladder. Sure enough the wind was whipping up. Picks up the shovel and starts shoveling again, here’s the snowplow and decides to just push it all in the street, why lift!

Walks back in the house and says tomorrow the other one!

Just went out there, cold as heck, 30 mph winds and both are still snapped (the one side I left the zipper open at the bottom), btw the picture, thats from yesterday of the marsh we live next to. Kept walking into the house, I’m not shoveling!

Dakota Collectibles – Pebbles from the Flintstones – Tote Bags

Today thought I would do a couple of lil girl tote bags with Pebbles from the Flintstones on them. The totes will be Christmas gifts for my nieces in Alaska. They will be presently surprised once they are received. With the tote bag will be a smaller bag for them to put other lil items, however no embroidery. I will attach snaps to the tops of each tote so items don’t fall out of them.

Currently SewforLess has this CD-Rom on sale for 59.99. This is where I received these designs. Mike carries a great selection of embroidery designs as well as other items for machine embroidery. You need to check out the site as he also has giveaways going on during the holiday season, please see my blog about this week’s item that ends on the 10th, by clicking here. NOTE: Copyrighted designs CANNOT be stitched and sold for a profit, you can only stitch these items and give as gifts.

I was very impressed with the designs on this CD and they stitched out great. The tote bags were small in size, so I had to re-size the designs in Embird, but the density of the stitches stayed together. The designs come in two sizes, 3×3 and 4×4. I shrunk the designs small enough to fit the tote bags, which was smaller than 3×3. The coloring of the designs are prefect and I used Metro Embroidery thread. The thread is great and brilliant!

Tomorrow I will go back and stitch out a couple more for gifts. I might even run to my near-by Wal-Mart and get some sweatshirts to do some more designs for the girls and their mom (she wants a moose on her sweatshirt, now to see if I have a design just for her).

Yeah it feels good to be back in the sewing room!

More later…… don’t forget to check out SewforLess for sales that are going on!

Happy Stitching to you all!

The CAVE gets an updated look

Now that I’ve taken pictures and have internet service once again I can now show you the two month project that I did. It was completed by dear hubby’s birthday.

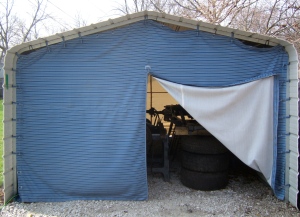
Basically it was a idea and had to use my skills in order to make it more comfy for my husband to work on his project – – – he is building a jeep. We live on a septic field and in order to build a garage it’ll cost lots of money. So instead he purchased one of those car ports. Instead of just having a roof, he bought additional siding so that the whole item is enclosed. We call the car port the “cave”.

Now that my son and husband are finally in the stages of putting all the parts together on the jeep, the weather has changed. In order to keep the wind and elements from getting inside the “cave” and possibly ruining the newly sandblasted and powder coated frame, I decided to make covers for each end of the cave. Of course no pattern, just ideas running in my head. I figured I would give it a try, what do I have to lose, only time and money.

Our nearby Jo-Ann’s Fabric store was closing, a mile away a new one would open. I stopped in to see what material they had to offer at a great price. I was able to purchase outdoor canvas material at a reduced rate if I bought the whole bolt. Hmmm lets do the math… I need at least 8.5 yards and this striped material has over 9 yards, regular price is over 17 bucks a yard, 75% off, yeah lets take it. I mean this was just going to be a test to see if I could make a cover and for 45 bucks can’t go wrong. So now where do I start.

Well I had taken all the measurements of the opening. I took the fabric and cut the yardage in half. Then sewing the two pieces together at the middle, folding the seams to one side and then topstitching, folding the one seam over 1/4 inch and then cutting the inner seam, I then stitched down the opposite side. Yeah I know there is a name for this type of seam but I can’t remember what it is called. I then clean the ends with a finished look and reinforced it by doing a zig zag. Now lots of ideas are running through my head. We have field mice. It would be good to keep them out, however there would be no way to do this. I had envisioned taking aquarium rock and put it in the 2 inch hem to weigh down the cover, this way if the wind gets nasty, the cover would not be flapping all over.

Then next step was to make straps that would be attached all around the cover with snaps that wrapped around he metal posts. So I measured each area that there was a small opening to slip these straps. The straps are 1 1/2 inch thick and the length varies. Then I added snaps that you use on heavy duty clothing items. Man those snaps are expensive, 6 snaps for around 7 bucks. I needed a lot of snaps and I was going to be using up 4 packs that I got on sale, more where needed! Well I got one side done and ready to attempt the next side. Second side done, now to dragged the cover out and put it on. Mmm, disappointment. The cover was too tight. As my daughter put it, it looked like a tube top that was too small for the person, rolling eyes. So I had to take the straps and had to add additional binding to my straps so that it wouldn’t be so taught. Okay got both sides down, drag it out once again, grrrrr now its too loose! I’m not giving up yet, I just took my pins out there and as the straps were snapped in place and around the metal fixtures I pinned appropriately. Corrected the straps and now to do the top of the cover.

Grabbing the ladder I crawled upward, yeah I’m afraid of heights and the ladder was wobbly! Taking my marker I traced the arch of the roof and marked the areas where the straps would slip through. Dragged the dang thing back into the house, folded in half added 2 inches to the top for a finished edge and then cut. Gaining ground, made the straps, finished the edging on the top and feeling proud. Thing is I am working on this project while my hubby is at work, he is unaware of this surprise, until that one day, he came home early. He took a look and gave a funny smirk, one that you just want to hit em, lol. He felt the material and said what kind of material, I told him and he just laughed at me. I’m finally done and putting it up. Well the nerve. He goes out there and likes it after he laughed at me, then he has to say, you have a flaw in your cover. You can’t snap it closed when you are inside! Geez, all I have to do is make straps that close from the inside, but NOOOOOOOOO that is not good enough. Can you put a zipper on it! Come on, I’ve already have it all done, now you want a zipper (yeah it went through my head to put one in but where do you find a long plastic zipper).

Off I am back at the fabric store looking for a zipper. Well I put in a upholstery zipper, yeah its metal and it’ll freeze and lock up in the cold, snowy weather, but at least you can’t say I tried, giggles. So I get the zipper in looking nice and such. What does he do a week later, breaks the zipper, geez thanks kiddo. So of course the words from the wise, how ya gonna fix it, tie straps dear, tie straps! That didn’t go over good. So off again to the fabric store asking if they had long zippers, nope. So I was standing by the zippers and guess what I found. Sleeping bag zippers, whooo hooot! Thing is I was not about to rip out the other one so I placed it in the same area of the broken one, remember this was just a sample. Got it back up and it was great. Man he was saying how much it cut down the wind when he was working in his cave and when would he have the other side done. Again the nerve! Two weeks hun, two weeks.

So off I go to find some material for the other side, hopefully just like what I purchased, but guess what, can’t find it. So instead I bought duck cloth. Lot heavier and **cheaper**, bought it with a coupon 50% off, still a great savings. The associate didn’t like it when the bolt I had, had less than 9 yards on it and she had to re-measure another bolt, oh well. During the time that I was constructing the other side we were having major wind storms. Uh oh. Yeah the cover that was on the cave was coming off, the snaps were unsnapping, yeah you guessed it, complain, complain, complain. Hey deary, you have an open side and a closed side, wind blows through of course its gonna open up, rolling eyes. And your building a jeep, good thing your son is there to help!

With the second cover, I basically made it the same way, however I made a center seam to put in a zipper so I would not hear any whinnying. Unfortunately the zipper that is in there is a upholstery zipper (the other one broke after I put it in). He is being smart and is not opening and closing it (in the summer I will put in the sleeping bag zipper I purchased).

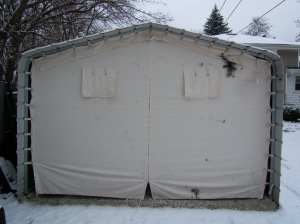
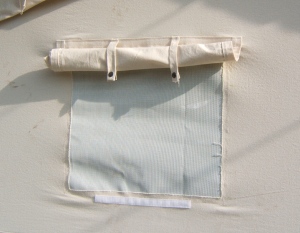
One day as the guys were talking, hubby was mentioning about getting a heater for the cave so he could work out there on cold days. Well I was planning this before the guys conversation, but I would be putting windows on this side. Yup I’ve got the screening and I knew I could get those windows in, as they would need venilation from the heater. I was really happy that I was successful with the windows and the cover was looking really good. One the outside of the screened window is a panel and straps with snaps so that the panel can be rolled up. When they are closed there is velcro to keep the panel down.

Our daughter made the comment one day, gee mom aren’t you glad you are doing this! Since I had already made one cover I knew that this one would go quickly. Again I did have issues with the straps, however because I did not wash the duck cloth material, it shrunk when we had a down pour and well I will have to add binding to the lower straps so it is not so tight and the zipper will close properly. Also the sides of this cover have a small opening, but that is okay because it’ll help with venilation.

The covers look great and serve their purpose, even though they are mismatched, (I already said I would make a new one in the summer to match with windows) but hey, the duck cloth cover already got christened. The axle of the car fell on it and leaked grease all over it, rolling eyes. MEN! When the wind blows the covers stay on, the only time the snaps break is when the man removes the cover and doesn’t grab the extra tag on the straps, shaking head.

Enjoy the story and the pictures. If you have any questions or comments, feel free to post. If you have an project and need help, feel free to post!

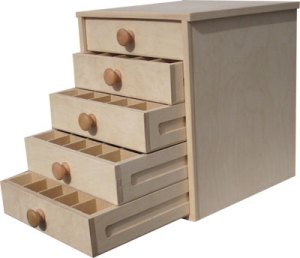
Small Spool Wood Storage Cabinet from MetroEmbroidery

Figured I would stop by Metro Embroidery Threads to see if they have a sale going on. Much to my surprise they have this “awesome” wood storage cabinet for their small spools of embroidery thread.

The neat thing about this cabinet is that it keeps the embroidery thread clean and dry , as well as the other elements that can weaken embroidery threads, sun and heat. This item is on sale for 69.00 until supplies last, if you order the finished wood, cost is 10.00 more. 6 drawers, you can easily color coordinate your threads and everything will be organized at the tip of your fingers!

What makes this cabinet so awesome is the size, 12 1/2 width, depth and the height is 14 inches. You have an option of either having it unfinished, thus you can paint it to match or decor OR you can order it for an extra charge for the natural wood finish. The cabinet only weighs 23 pounds, yes that is without the thread. You can even order the cabinet with thread!

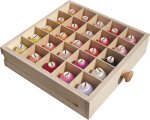
This cabinet holds 125 small spool threads, thats 25 spools in each drawer! Now how many of us have that amount of thread? I know I have more than that! The cabinet was specially designed to hold only Metro Embroidery thread, so if you have ordered previously from then, this is the item that should be on your Christmas list, heck Christmas, any occasion! However, each compartment size for each spool of thread is, 2W x 2D x 2 1/2 H, so you just might be able to use this item for other embroidery spools. So before you order make sure your non Metro Embroider Threads will fit in each cubby.

This item usually retails at 129.00! You can’t go wrong with the sale price of 69.00 (natural color wood add 10.00). I wish they had something like this for the big spools. I like the snug compartments, you can see each color clearly. You can either put a piece of paper on the bottom of the drawer with the color number or on the back of each compartment so that if you have spools all over, you will know where to put the ones you’ve used. This cabinet is handmade in the USA.

I see that Metro Embroidery now has two types of stabilizer as well. Tearaway and cutaway (soft) in 6 x 6 sheets. They are in the process of obtaining and selling 8 x 8 sheets. Check out the prices on their site.   Currently they are on sale, half off, can’t go wrong there. Now you just need to get it on your list to Santa.

Metro threads are currently priced at 2.25 for the big spools and .75 for the mini spools. Check out the package deals they have. And check out the varigated threads that are .99 each spool. They also have bobbin thread.

Before you put in your order make sure you check out their coupon area. You can get a 10% savings on an order 99.00 or more, HOWEVER, make sure you see the small print on the two items that it does not apply too!

Oh and by the way, if you click on the BLOG on their main page, yup you got it you come directly to “Clicketyclak”, so check them out and check me out as well. Add your name to being a FAN in the upper right hand corner.

SewforLess Continues their Holiday Giveaways

Can you believe it SewforLess has another great giveaway this week. All you need to do is leave a comment and you are automatically entered! Could it be more simplier, don’t think so.

You see Great Notions put together just for SewforLess a design pack of a 100 embroidery goodies. You can easily see a PDF of all the designs included in the pack of goodies by clicking on this area. The PDF provides you with the design name, number, amount of stitches, color changes and finally the height and width. A total of 6 pages of all types of embroidery designs. What more could you ask for!

As always, SewforLess will draw one winner randomly. Look for the official Free Embroidery Stuff Rules on the above site. This particular contest ends on December 10th around 10 am. So post your comment in order to win. There is only one comment per person.

Better watch out Mike is throwing snowballs, so pack your snowball and see if you can hit him. You might get lucky and hit the bullseye and grab this giveaway. GOOD LUCK!