Tag Archives: Knitting

Knitting – Hooded Scarf

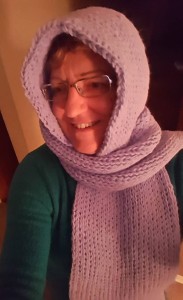
For a gift I made a hooded scarf with my Boye Knitting loom. She wanted something long and heavy with the cold winters we have here in the Chicago area. I showed her the hooded scarf and she said perfect.

When doing the hooded scarf, the directions come with the Boye Knitting loom set, you need to have 1000 yards of #4 worsted yarn. Barb wanted a particular purple hooded scarf, a lilac color. It was hard to find exactly what she wanted, however I ended up purchasing one massive skein of yarn used for making baby quilts.

In the instructions it indicates that you use two strands of yarn throughout the whole thing. You cast on 24 pairs of pegs using the double knit cast on stitch. You continue to work in the double knit stockinette stitch until the scarf is 72 inches long or desired length. When I started this project I took both ends of the yarn. What a task.

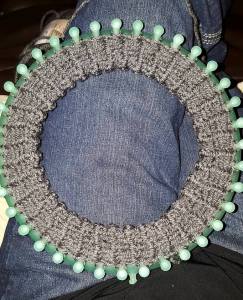
At first it wasn’t so bad knitting, but as the project progressed, the scarf became extremely heavy and had to keep rolling the finished area, to continue working. The stitch that they speak about you zig-zag back and forth from peg to peg. Wrapping that second row to pull the bottom over the top. At the time of this picture I do not know how long the scarf was, but rolling became extremely necessary.

12347628_10205667290701075_1579763746966126619_n

This was the biggest project I did, but the results were great. When you get to the end of you length you then bind off the last row. Then you fold the scarf in half and then slip stitch yarn in the inside from top to bottom 9 inches. You can add a tassel, however I kept it off because I was running low on yarn and I needed to make the fringe. I tell you this thing is HEAVY, very HEAVY. Barb loved it and enjoys it!

12366291_10205695628769509_2578650591001082819_n

Knitting – Fingerless Gloves

The best youtube I found for knitting fingerless gloves on the loom knit… youtube fingerless gloves diy It takes you through the whole process step by step. It is a short video and gives you the exact information of how many rows you knit, how to add different color yarns, where to add the thumb hole and how. I liked this video over all the other ones I watched because of the simplicity of the instructions, no confusion what so ever. Clearly done.

The gloves are done on one of the smaller round hoops, however you don’t need to necessarily have to use a round hoop. You can easily use a square one. There are other types of hoop kits out there and you can find techniques on how to make these more popular types of gloves through youtube.

After making my first set of fingerless gloves, yes for my daughter again, we realize that in the future the thumb hole needs to be placed in a different spot. I would make the length of the gloves longer, so that they cover a bigger part of the arm area, so if your not wearing a jacket but some other form of outerwear you could slip them under the sleeve. For her since her fingers are not as long as mine, I would also shorten the top part of the glove. She indicated that wearing while driving there is more slipping on the steering wheel. Which I can understand and see. I am currently in the process of making myself a set. Maybe next year I’ll be done.

The cuff of the glove is the black area and to form it is exactly like the brim of a hat. You do not use the same stitching for the gloves that you did with the hats, if I recall you do a knit and then purl. A knit you take the bottom piece of yarn over the top yarn. Then the next peg you take the bottom yarn and slip it under the top. You continue to use this process throughout the project. You need to keep your tension pretty much the same throughout the knitting.

When making the first set of gloves the hardest part is when you add and alternate the colors of yarns. Your yarns might not match up perfectly, but again a learning curve. This is where you also learn about using tension. When I did the left hand I had to make the hole for the thumb opposite of the directions in the video. In the gloves that I made I only used two colors of yarn and I did my own pattern than the one shown in the DIY video.

Learning a new craft – Knitting

I always wanted to learn how to knit however I couldn’t get the sticks to work with me. I’ve seen those knitting hoops/looms in the store and thought what the heck give it a try, what do you have to loose. OMG LOVE IT. Starting out with the round looms, I ended up getting a set with rectangular ones as well. It was a great deal, on sale and included projects book.

You can do so much with knitting hoops/looms. Hats, scarfs, cowls, quilts, the list goes on and on. Taking the remains of skeins of yarn from scarfs that I had crocheted, I loomed hats. Looming is so fun and easy. And there are lots of youTube videos to help out in making your creation. Most of the hats only take one skein of yarn and a few hours to complete. I usually use the simple pattern, but I’ve taken a step and learned other stitches. At first it look confusing, but after viewing a few youTubes, I got it. All you do is wrap the yarn around each peg twice, pulling the lower piece of yarn, using a hook, over the top one. Then you just continue to wrap yarn row after row.

11203690_10205605614839217_4269665199054809596_n

There are two different types of hats you can make. One with a brim and one without. The majority of hats I’ve made are without the brim because that is what my daughter prefers. When making a brim you loom 18 rows and on the 19 row you bring the inside of the hat and attach it to the pegs. Then knitting (hooking) the bottom over the top to complete the hemmed brim.

When you reach about 23 cm or 10 inches in length, you cut the yarn, thread it on a big needle and pull each loop off the peg, through the needle. After you have removed all the loops off the loom you pull it tight and take the needle to the inside of the hat. Weave it through some of the loops and tie it off and cut.

Here are some of my first hats.

12274674_10205604435569736_8203490435872468323_n

These were great gifts for the holidays. My daughter ended up with a large collection of hats of different colors and weights. She uses them mostly when she works in the warehouse picking orders for the company she works for. Its cold working in the warehouse but she wears a headset when she picks merchandise and its just perfect as the hat protects her ear from the heavy headset. When we take a long drive, I grab my loom, yarn and hook and off we go. I believe my daughter has about 15 different hats and she gets lots of compliments.

A few more of the completed hats. Should have never thrown my head form out, grrrr.

I was able to make a pair of ear muffs with some of the yarn that was left over as well.

I purchased a Boye Loom Knit kit.

What a Bundle and ITS FREE!

You can make this! What is your craft? Scrapbooking? Sewing? Knitting? Crochet? Jewelry?

 What ever it is, this site is for you. The categories are endless, whether you are a beginner or not.

 The best part is, if you sign up for their newsletter now, you will receive a free video and eBook bundle  that’s  a $75.00 value. Where else can you go to get a bundle like that?

 Looking to learn more about polymer clay, embellishing a pair of jeans or learn basic decorating of cakes, visit “You Can Make This” today!

So click on the box and sign up for the newsletter now. Don’t forget to look over the site and check out the “free” category area to download one of their projects now!