Tag Archives: Canvas

Finishing Old Projects – Lining Beach Totes

Isn’t it always true that we have a project laying around that needs to be finished. Oh I have lots of them. I get started on one thing and the next thing you know, I am pushing it aside and moving to something new. Well heck look at my blog, I’ve been posting a bunch of stuff lately.

Being bored and not wanting to watch tv with my spouse, I finally got up off the couch and wondered what to do. I couldn’t make any more of those pouches/bags from the other days because I need more batting and interfacing. Tomorrow a trip to JoAnn’s, they have interfacing on sale, plus a few other items.

I was going through my treasures last week and remembered the beach totes. I am planning on setting them up for sale and I better get them done. They only need to have the lining and handles put on. Shouldn’t take long. Remember – “shouldn’t”!

I look for that dang plastic container I put them in and almost ditched the idea, but I stuck to my guns. 3 containers later, found! I had started these totes a bit ago and they will definitely make great beach totes or even weekend traveler totes. These are comparatively small, in my eyes, as I’ve made even bigger ones.

So lets get to the lining. No matter what type of fabric purse or tote I make, I like to have pockets in them. Planning on just putting two on either side of the tote. These pockets are generic and easy. I don’t know if I have posted construction of pockets in the past, but I am going to anyways do it again. I will be posting another one in the near future as I have one more lining to complete and I want to cover how I do pockets in that one.

I cut my fabric for the lining 21 x 34. I don’t plan to have a seam at the bottom, just a box end. I cut a piece of fabric that was 9 inches in length, 44 width. I then cut the fabric in two. I folded them in half. Before doing anything else, I ironed and used some craft interfacing on one side of the pockets. To the sewing machine. I sewed the side and top of the pocket. Cutting the corners carefully, turning right side out, pinning, then ironing. The reason I pinned after the sewing, I want to make sure my seams are clean. I then quickly sew two lines of top stitch. Now ready to place on the lining.

20160214_123826_resized

I find my middle on the lining fabric.  I then have to figure where the placement of the pocket will be. When I do my bags/totes I take and fold over the main fabric into the inside to give it a more clean finish. There is about 3 inches. I don’t want to go down too far, but then again, I don’t want it to be too high. I figured I will go 4 inches down from the raw edge of the top of the lining.I am figuring I have 6-7 inches from the top of the pocket and the height of the bag is around 17, the height of the pocket is 8, figuring the top seam and the bottom, so thats perfect. Hope I haven’t lost you yet, but if your a sewer you can visual.

Laying my ruler on the raw edge of the fabric, in the middle, I then place the pocket in line with the ruler. I still have that raw edge on the bottom of the pocket that I didn’t stitch up because I always like to take 1/2 inch and fold it up. What I do is I take that “1/2 tail” and sew it on the lining to form the bottom of the pocket, I previously ironed that edge. That closes up the pocket and keeps it straight. First I did a straight stitch, following behind that I then stitched a stitched zig-zag stitch. Now the pocket is secure to the lining.

20160214_124416_resized

Now you fold the bottom of the pocket up pin on the top and bottom of each side of the pocket. When ready to sew, sew from the bottom to the top to ensure that it lays flat and there is no little gathering from extra fabric sewing from the top to the bottom. I used a two top stitches on both sides of the pocket. Eyeball the distance from the sides of the pockets. I can’t give you my dimensions because all machines are different.
20160214_132046_resized

Here you see the top of the pocket with two lines of top stitching, the folded bottom and then the top stitching on the left side. Usually when I make pockets, I like to have the top of the pocket seamless and the bottom of the pocket <raw edge> turned over. The only noticeable seams would be on each side. I was not thinking when I cut the fabric. I like my purses to have clean edges. It looks more professional. Oh well I’m not perfect.

Now when I cut my lining I cut it to the width of the bag. the height was the whole length of the fabric, so I cut off some of the top because I was not planning on making a bottom seam in the lining. Does that create a problem when sewing the lining to the bag? No. But now I am ready to stitch both side seams and create my box side. Since the bags or totes have been sitting, I wasn’t sure what size the box corner was, so I merely measured the tote. It was 5 inches for depth. I ironed my lining to make sure I had a line to line up my side seam to the bottom crease (fake seam). Taking a ruler, I measured 5 inches from side to side and then marked with a marker that eventually disappears. Then I stitched down the line using a stretch stitch because it stitches the seam with 3 threads. This will hold the seam well. I then also did a stitched zig-zag next to the seam. I just have a thing about making sure particular seams are sewn securely.

Yes, I could have folded the seam in the middle however I didn’t. I have no reason to give. I then cut the extra fabric from the corner. Then I placed both pieces together. The outside of the tote to the inside of the lining (pockets to the main fabric). Stitched the top, leaving enough room to turn. The open area of the lining to main fabric, I stitched closely together and did not hand stitch closed, my preference as long as I do it closely and its not noticeable. I then measured the main fabric around the top, giving the dimension I want for the main fabric to be inside the tote. Ironed the top to from a crease, then did two top stitches. Ready to put the straps on. I didn’t measure how long the straps were. I had them pre-cut when I first started these 3 tote bags.

NOTE: Did you know when using binding trim for handles on tote bags, you use a lighter to melt the fibers together so they don’t fray. This is for the strapping trim that is not cotton!  And if you are ironing out creases make sure you use the lowest setting on your iron. Dang stuff melts to your iron, yeah I did it.

When I put the straps on I measured 4 inches from the side seams. I eyeballed how far I wanted them to be from the top of the tote. I had 3 tote bags to do. As I grabbed the green striped one, to check where I had calculated placement of the straps, I looked and again – – SURPRISE – it was already lined. Now why couldn’t the blue and white striped one have been done too. I would have had only the white and yellow stripe to do. Always something. So here are the two finished beach tote bags (the green one just needed straps, go figure). And these totes were ironed nicely, prior to putting on the straps, who’d of thunk they would get all wrinkled after I put them on. I was tired and just wanted to get snaps of them both. You will see the yellow one is a longer tote, so more room to stuff more stuff! I like both of them. When I do the blue one.. I’ll do the lining similar to the green one and post it. The green one actually has a zipper pocket, omg how did I do that – I HATE ZIPPERS!

Cave gets new fabric panels

Well it was time to make new covers for the cave as the weather wore away the old ones. With the winds here in Chicago two years did them in, as well as the snow storm we had last year. I used duck cloth to construction these panels. Windows have plastic screening and can be rolled up on cold days when the heater is being used and air flow allows the smell out from the tank.

I decided to make changes from my first ones I made and the thinking process still works. With the changes on these fabric covers on this structure I made it easier to sew up and install.

The last one that I made I had constructed the panels to be held by using straps to hold against the steel rod frames using heavy duty snaps. However with the Chicago winds, the snaps would either open or break loose from the fabric. So instead I used heavy duty adhesive velcro. I applied the velcro to the steel rods and used wire ties to secure the velcro as we all know adhesive tends to wear down with time. I then made my fabric panels in three parts. Yes I reused part of the old cover for this one so I did not have to reconstruct and make new straps for the top attachment to the rods. You can see the different color straps, blue, against the green fabric. With the economy the way it is, I was better off saving money.

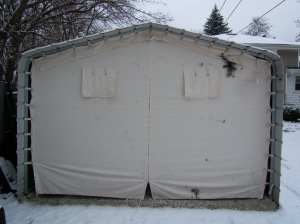
In the above photo you can see what the cover looks like closed. And yes it has windows in the front, with a zipper down the middle. The type of zipper I used was a sleeping bag zipper. It was long enough.

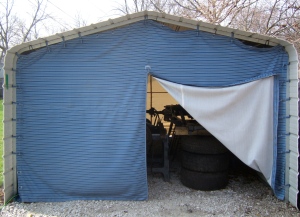
In this photo you can see how you can easily roll up the side while working in the structure. On the top I again used the heavy duty adhesive velcro, however I did use industrial glue spray to keep the velcro on both the top and side fabric so that with time it would still hold up. I found that even though it has adhesive on the velcro it would detach from the fabric, thus the spray. 3M has a great adhesive, however costly <thank you Bob for the glue, winks>. On this panel I did sew several straps for added precaution of the winds, however it was not needed when I constructed the second panel, but the straps are nice when you roll up the individual panels.

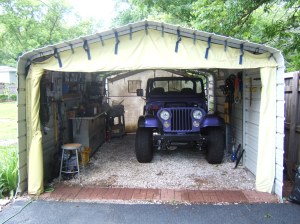
This is the final photo showing both panels rolled up and opened. Nice easy access to the structure. See the jeep, that is what the guys were building for the last two years. Nice huh. Not bad for a project and when you don’t have a garage to build, next best thing is the “cave”.

Hope you like, now if only we can get the insurance company to get the car insured for its worth, we would be happy. We are still awaiting word, they are currently using the Blue Book Value of the 86 CJ. Uhm so the pictures we gave you.. you can’t tell that its customized, classic and wasn’t bought off a used car lot? Scratches head, something wrong with the picture? Uhm well we can take our business to a company that deals with classic custom cars. And we aren’t your average Joe that buys a custom classic car for big bucks to drive around in saying yeah nice huh and just think I just put money down to look good. Not us we are not that average Joe, we actually bought, built and can go driving around turning heads and say “We built it all from used and new parts”. It was a great learning process and one day our son will teach his son, well his girlfriend wants to build one now…. no son yet.

The CAVE gets an updated look

Now that I’ve taken pictures and have internet service once again I can now show you the two month project that I did. It was completed by dear hubby’s birthday.

Basically it was a idea and had to use my skills in order to make it more comfy for my husband to work on his project – – – he is building a jeep. We live on a septic field and in order to build a garage it’ll cost lots of money. So instead he purchased one of those car ports. Instead of just having a roof, he bought additional siding so that the whole item is enclosed. We call the car port the “cave”.

Now that my son and husband are finally in the stages of putting all the parts together on the jeep, the weather has changed. In order to keep the wind and elements from getting inside the “cave” and possibly ruining the newly sandblasted and powder coated frame, I decided to make covers for each end of the cave. Of course no pattern, just ideas running in my head. I figured I would give it a try, what do I have to lose, only time and money.

Our nearby Jo-Ann’s Fabric store was closing, a mile away a new one would open. I stopped in to see what material they had to offer at a great price. I was able to purchase outdoor canvas material at a reduced rate if I bought the whole bolt. Hmmm lets do the math… I need at least 8.5 yards and this striped material has over 9 yards, regular price is over 17 bucks a yard, 75% off, yeah lets take it. I mean this was just going to be a test to see if I could make a cover and for 45 bucks can’t go wrong. So now where do I start.

Well I had taken all the measurements of the opening. I took the fabric and cut the yardage in half. Then sewing the two pieces together at the middle, folding the seams to one side and then topstitching, folding the one seam over 1/4 inch and then cutting the inner seam, I then stitched down the opposite side. Yeah I know there is a name for this type of seam but I can’t remember what it is called. I then clean the ends with a finished look and reinforced it by doing a zig zag. Now lots of ideas are running through my head. We have field mice. It would be good to keep them out, however there would be no way to do this. I had envisioned taking aquarium rock and put it in the 2 inch hem to weigh down the cover, this way if the wind gets nasty, the cover would not be flapping all over.

Then next step was to make straps that would be attached all around the cover with snaps that wrapped around he metal posts. So I measured each area that there was a small opening to slip these straps. The straps are 1 1/2 inch thick and the length varies. Then I added snaps that you use on heavy duty clothing items. Man those snaps are expensive, 6 snaps for around 7 bucks. I needed a lot of snaps and I was going to be using up 4 packs that I got on sale, more where needed! Well I got one side done and ready to attempt the next side. Second side done, now to dragged the cover out and put it on. Mmm, disappointment. The cover was too tight. As my daughter put it, it looked like a tube top that was too small for the person, rolling eyes. So I had to take the straps and had to add additional binding to my straps so that it wouldn’t be so taught. Okay got both sides down, drag it out once again, grrrrr now its too loose! I’m not giving up yet, I just took my pins out there and as the straps were snapped in place and around the metal fixtures I pinned appropriately. Corrected the straps and now to do the top of the cover.

Grabbing the ladder I crawled upward, yeah I’m afraid of heights and the ladder was wobbly! Taking my marker I traced the arch of the roof and marked the areas where the straps would slip through. Dragged the dang thing back into the house, folded in half added 2 inches to the top for a finished edge and then cut. Gaining ground, made the straps, finished the edging on the top and feeling proud. Thing is I am working on this project while my hubby is at work, he is unaware of this surprise, until that one day, he came home early. He took a look and gave a funny smirk, one that you just want to hit em, lol. He felt the material and said what kind of material, I told him and he just laughed at me. I’m finally done and putting it up. Well the nerve. He goes out there and likes it after he laughed at me, then he has to say, you have a flaw in your cover. You can’t snap it closed when you are inside! Geez, all I have to do is make straps that close from the inside, but NOOOOOOOOO that is not good enough. Can you put a zipper on it! Come on, I’ve already have it all done, now you want a zipper (yeah it went through my head to put one in but where do you find a long plastic zipper).

Off I am back at the fabric store looking for a zipper. Well I put in a upholstery zipper, yeah its metal and it’ll freeze and lock up in the cold, snowy weather, but at least you can’t say I tried, giggles. So I get the zipper in looking nice and such. What does he do a week later, breaks the zipper, geez thanks kiddo. So of course the words from the wise, how ya gonna fix it, tie straps dear, tie straps! That didn’t go over good. So off again to the fabric store asking if they had long zippers, nope. So I was standing by the zippers and guess what I found. Sleeping bag zippers, whooo hooot! Thing is I was not about to rip out the other one so I placed it in the same area of the broken one, remember this was just a sample. Got it back up and it was great. Man he was saying how much it cut down the wind when he was working in his cave and when would he have the other side done. Again the nerve! Two weeks hun, two weeks.

So off I go to find some material for the other side, hopefully just like what I purchased, but guess what, can’t find it. So instead I bought duck cloth. Lot heavier and **cheaper**, bought it with a coupon 50% off, still a great savings. The associate didn’t like it when the bolt I had, had less than 9 yards on it and she had to re-measure another bolt, oh well. During the time that I was constructing the other side we were having major wind storms. Uh oh. Yeah the cover that was on the cave was coming off, the snaps were unsnapping, yeah you guessed it, complain, complain, complain. Hey deary, you have an open side and a closed side, wind blows through of course its gonna open up, rolling eyes. And your building a jeep, good thing your son is there to help!

With the second cover, I basically made it the same way, however I made a center seam to put in a zipper so I would not hear any whinnying. Unfortunately the zipper that is in there is a upholstery zipper (the other one broke after I put it in). He is being smart and is not opening and closing it (in the summer I will put in the sleeping bag zipper I purchased).

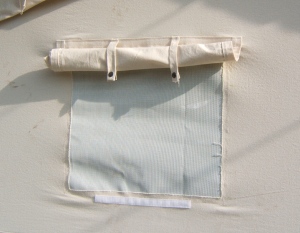
One day as the guys were talking, hubby was mentioning about getting a heater for the cave so he could work out there on cold days. Well I was planning this before the guys conversation, but I would be putting windows on this side. Yup I’ve got the screening and I knew I could get those windows in, as they would need venilation from the heater. I was really happy that I was successful with the windows and the cover was looking really good. One the outside of the screened window is a panel and straps with snaps so that the panel can be rolled up. When they are closed there is velcro to keep the panel down.

Our daughter made the comment one day, gee mom aren’t you glad you are doing this! Since I had already made one cover I knew that this one would go quickly. Again I did have issues with the straps, however because I did not wash the duck cloth material, it shrunk when we had a down pour and well I will have to add binding to the lower straps so it is not so tight and the zipper will close properly. Also the sides of this cover have a small opening, but that is okay because it’ll help with venilation.

The covers look great and serve their purpose, even though they are mismatched, (I already said I would make a new one in the summer to match with windows) but hey, the duck cloth cover already got christened. The axle of the car fell on it and leaked grease all over it, rolling eyes. MEN! When the wind blows the covers stay on, the only time the snaps break is when the man removes the cover and doesn’t grab the extra tag on the straps, shaking head.

Enjoy the story and the pictures. If you have any questions or comments, feel free to post. If you have an project and need help, feel free to post!

Machine embroidery is not just for fabric

As tired as I may be, I thought that in the coming weeks I would talk about some how-dos on machine embroidering not only for the beginners out there, but for the advance embroider as well.

I’ll talk about different projects that I’ve done. If a reader is interested in something particular and has questions or needs assistance, I’ll be more than happy to see if I can assist or even another reader can give a few pointers.

We all try to embroider on different types of fabric. We take that chance to see how well we succeed. I haven’t embroidered on every type of fabric, but I’m getting there. There are some fabrics that I just don’t wish to take the chance or well I just have no desire to even try.

dscf0674

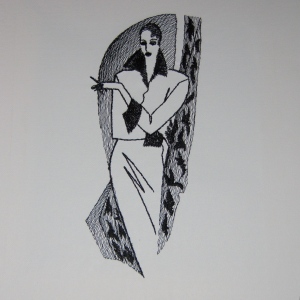
I like to experiment. I like to take a chance to see how creative I can be. In this photo I embroidered on painting canvas. Looking at the picture you could assume that it was a possible etching. But as you get close to it, you see the actual stitches and you want to touch it. Sure enough the item is dimensional. When I first presented this to the sewing club that I went to all the women were amazed at my handy work. The questions that came out. Did you hoop the canvas? What stabilizer was used? The canvas was hooped and it wasn’t easy because of the thickness of the canvas. There was no stabilizer used. The fiber of the canvas is already thick and the density of the design wasn’t complex that I wasn’t worried that it would pierce and rip the canvas. The reason stabilizers are used is to keep shape. With painting canvas you end up stretching it on a frame. As long as the design kept its shape while stitching out, I didn’t have to worry about anything. While the design stitched there would be an occasional pucker, but again, its going to be stretched. I did a series of 3 designs of these vintage ladies that I purchased from BFC. I sold the set and will continue to do more in the future on canvas. My next set will be Geisha ladies. Depending on the density of the design, I might put a stabilizer behind it just for added protection, but then again, do you want to see a cut away stabilizer on the back side?  I have since purchased fast frames and it’ll be easier to work with.

Machine Embroidery on Canvas

Sorry all but I’ve been playing with pictures and downloading.

I can’t believe that all the cards I have for my digital had pictures on them and I never put them to the puter, so that is what I was doing all night.

Still have to take pictures of my tote bag but I had to clear the cards first.

Here is a picture of one of my vintage ladies that I did on canvas and then I stretched in on a frame. If you would like to see the complete set, go to the sidebar and click on my etsy link.

How do you like it? It looks like a etching, but when you get close you see the stitches and you can feel the texture. 

I did some vintage bath tubs too, but I have to find them. I think I stretched those on frames, but I can’t remember.

Well thats it for tonight. Didn’t get much sleep last night had to call the county for disturbing the sleeping. Dang neighbors and their garage band! Whats with weeknights!